| Version 2 (modified by , 9 years ago) (diff) |
|---|
Creating and using a public/private SSH keypair
(For accessing the RP3 virtual machine in the Cloud.)
Creating a keypair on Linux or Mac OSX
- Generate a public/private keypair
If you have files named
~/.ssh/id_rsaand~/.ssh/id_rsa.pubyou're fine. Proceed to step 2.
If not, type the following command in
~/.ssh/:
ssh-keygen -t rsa -C 'your@email.com'
This will ask for a passphrase (twice). Although you could leave it empty, we advise to use a passphrase. See the instructions from GitHub for more info.
- Send your public key to the server maintainer
Your public key is in the file
~/.ssh/id_rsa.pub. Send it by email as an attachment. Proceed to step 3 after you got a confirmation.
- Login to the VM
For accessing the VM, you need your private key. It is in the file
~/.ssh/id_rsaand you should never share it. SSH will automatically find it.
To login to the VM, type the following command (you might be asked to type the passphrase for your private key):
ssh username@bios-vm.bbmrirp3-lumc.vm.surfsara.nl
Creating a keypair on Windows
(Instructions borrowed from Joyent.)
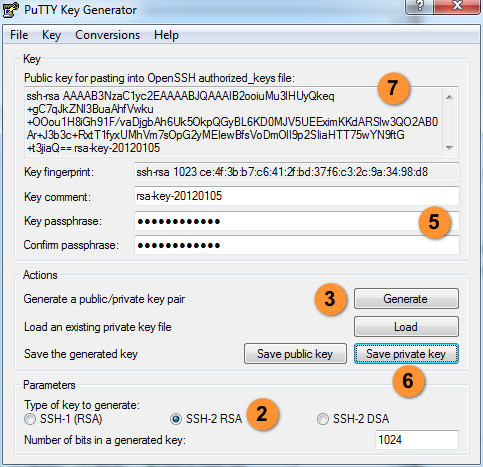
- Download and open the PuTTYgen program.
- For Type of key to generate, select SSH-2 RSA.
- Click the Generate button.
- Move your mouse in the area below the progress bar (note that moving the mouse is actually necessary, as it generates a amount of randomness in the keys). When the progress bar is full, PuTTYgen generates your key pair.
- Type a passphrase in the Key passphrase field. Type the same passphrase in the Confirm passphrase field. You can use a key without a passphrase, but this is not recommended.
- Click the Save private key button to save the private key. You must save the private key. You will need it to connect to your machine.
- Right-click in the text field labeled Public key for pasting into OpenSSH authorized_keys file and choose Select All. Right-click again in the same text field and choose Copy.
- Send an email to the server maintainer with copied content pasted into it.
Note: This method did not seem to work reliably for all of us, so you might want to create a keypair on a Linux or Mac OSX machine instead and copy it to your Windows machine.
Login to the VM from Windows using Putty
- Download and open the PuTTY program.
- Enter
bios-vm.bbmrirp3-lumc.vm.surfsara.nlin the "Host Name" field. - On the left, navigate to category "Connection/SSH/Auth".
- Click the "Browse" button and select your private key.
- Click the "Open" button to open the connection.
- First time, you will be asked to accept the server's signature (do so).
- You will be asked for your username.
Login to the VM from Windows using MobaXterm
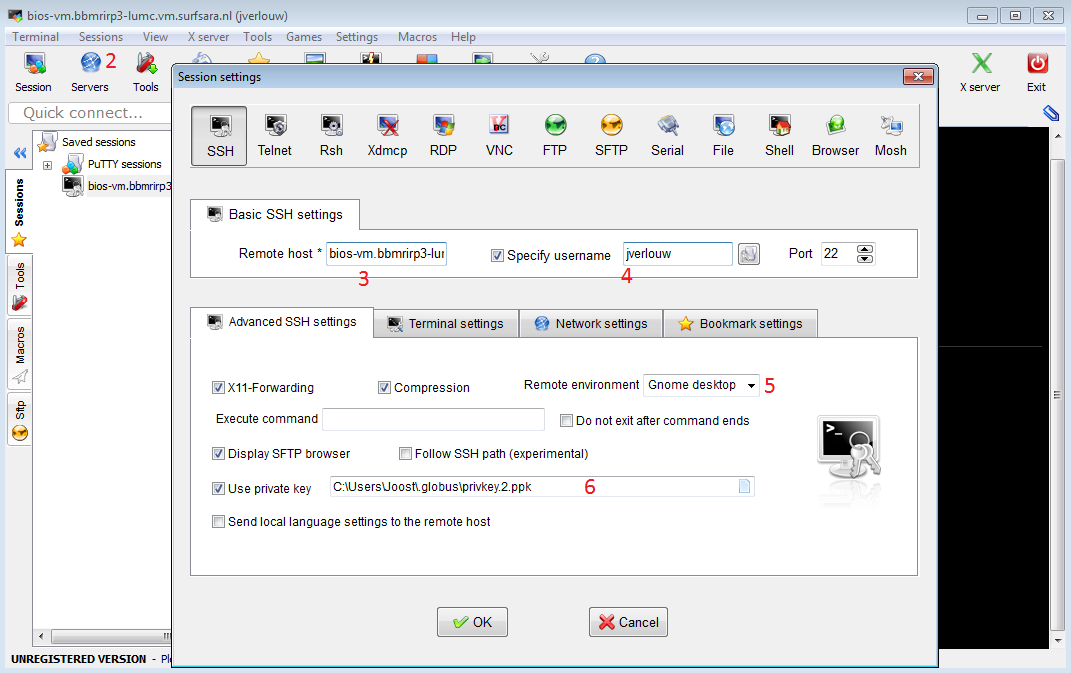
- Download, install and open MobaXterm.
- Create a new session via Session -> New session.
- Enter
bios-vm.bbmrirp3-lumc.vm.surfsara.nlin the "Remote host" field. - Tick the Specify username box and fill in your VM username.
- Select the remote environment. For a terminal interface use interactive shell, or for a graphical desktop interface use Gnome desktop.
- Select your private key file.
- Start the session you just created.
Login to the VM from Windows or Mac OSX using X2Go
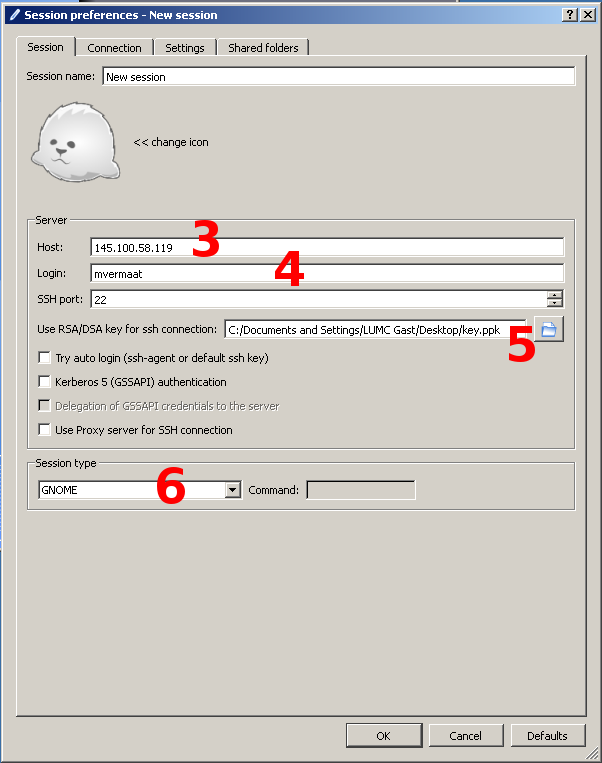
- Download and open the X2Go program.
- Create a new session (opened automatically, or via "Session" -> "New session").
- Enter
bios-vm.bbmrirp3-lumc.vm.surfsara.nlin the "Host" field. - Enter your username in the "Login" field.
- Click the button next to the "Use RSA/DSA key for ssh connection" field and select your private key.
- Select "GNOME" as "Session type" and click the "OK" button.
- Open the session you just created.
- First time, you will be asked to accept the server's signature (do so).
Attachments (5)
- MobaXterm.png (82.5 KB) - added by 9 years ago.
- putty1.png (11.1 KB) - added by 9 years ago.
- putty2.png (13.5 KB) - added by 9 years ago.
- x2go.png (24.3 KB) - added by 9 years ago.
- puttygengenerated2.png (72.8 KB) - added by 9 years ago.
Download all attachments as: .zip


